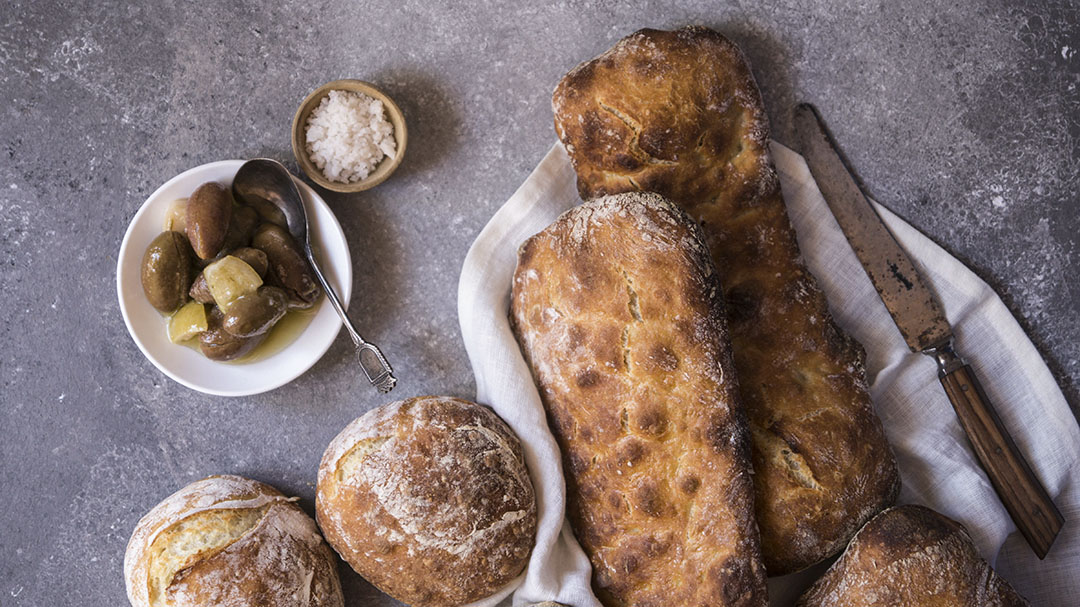
Libyan Bread
This recipe is definitely influenced by the Italians who lived in Libya ( Tripoli ), it is very close to the ciabatta bread except for the shiny crust of it as the Libyan one is wiped with a wet sponge right after it comes from the hot oven.
Growing up in Tripoli I used to hear the phrase ( khubzet mdas ) which means a sandal bread if we translate it but the name was given to this kind of bread because it has the same shape as the local sandals men use to wear back then ( which is kindda funny to name a bread over a sandal !!), so basically the dough is stretched to form a flat loaf that is thinner in the middle, thicker and round shaped from the edges.

The once called ( Khubza Mhawra ) is almost a round shaped ciabatta, the word ( Mhawra ) means round and this type of Libyan ciabatta is very close to the Italian one, mostly the same since its not wiped with the wet sponge to remove the dusted flour, yet it is kept the way it was formed before the final fermentation period.

Now as any deciduous bread, the ingredients are as simple as flour, yeast, salt and water then comes the method and fermentation magic to form a great bread dough, not to mention the oven and how to bake the bread that will definitely make a huge difference in the result.
The ciabatta is well known with its crunchy crust and the huge air buckets inside, to achieve this result it is a MUST not to deflate the air we keep creating during the fermentation periods and the folding processes, its important to work gently with it the dough.

Libyan Bread (Khubzet Mdas)
Ingredients
- 500 g strong bread flour
- 1 tsp salt
- 1 tsp dry active yeast
- 250 ml lukewarm water
Instructions
Mixing
- In a large mixing bowl mix together flour, yeast and salt then start pouring the water
over slowly ( you might need less or more of that water depending on your flour ), mix by hand till all combined and no flour lumps in the dough, you don’t
need to kneed the dough ( it should be a wet super sticky dough ), now cover
for 20 minutes.Uncover the dough, wet your hand and start folding, this is where you need to grab the
lower part of the dough to fold it on the top, repeat with all sides, cover for
another 20 mins.Uncover and give it a last folding process, cover and allow it to double in size (should
take an hour or more depending on your room temperature).After the dough is nicely doubled in size its time to shape it, flour a surface with a
generous amount of flour ( the dough is very sticky you will need that ), scrap
the dough with a scraper from the bowl to the floured surface.
Shaping and baking
- Cut the dough into 4 equal parts, fold the edges toward the center to form a loaf (gently don’t press), stretch the edge so the center will become thinner, transform on a baking sheet then repeat with the rest of the dough.Cover with a kitchen towel and allow to double in size while the oven is heating.Turn the oven on to 240C, rack in the middle.Once the oven is hot enough, fill a tin with some water and place it on the bottom of
the oven, leave in for 3 minutes to create enough steam.Take the towel off, pinch the loafs with the tip of your fingers on the middle part this
will push the air toward the sides more.Prepare a bowl of water with a clean sponge and set a side.Bake till they become nicely gold (watch the water in your tin not to fully evaporate)
at this point take the water tin out, squeeze the sponge from the extra water and wipe
the flour off from the bread, then continue to bake till they get that nice brown
crust.Remove from the oven and allow to cool on a wire rack.

Libyan Bread (Khubza Mhawra)
Ingredients
- 500 g strong bread flour
- 1 tsp salt
- 1 tsp dry active yeast
- 250 ml lukewarm water could be more or less depending on your flour
Instructions
Mixing
- In a large mixing bowl mix together flour, yeast and salt then start pouring the water
over slowly ( you might need less or more of that water depending on your flour ), mix by hand till all combined and no flour lumps in the dough, you don’t
need to kneed the dough ( it should be a wet super sticky dough ), now cover
for 20 minutes.Uncover the dough, wet your hand and start folding, this is where you need to grab the
lower part of the dough to fold it on the top, repeat with all sides, cover for
another 20 mins.Uncover and give it a last folding process, cover and allow it to double in size (should
take an hour or more depending on your room temperature).After the dough is nicely doubled in size its time to shape it, flour a surface with a
generous amount of flour ( the dough is very sticky you will need that ), scrap
the dough with a scraper from the bowl to the floured surface.
Shaping and baking
- Cut the dough into 6 equal size pieces fold the edges toward the center to form a ball (gently don’t press), use the scraper to make it round shape, stretch the edge bit to make it some how flat, transform on a baking sheet then repeat with the rest of the dough.Cover with a kitchen towel and allow to double in size while the oven is heating.Turn the oven on to 240C, rack in the middle.Once the oven is hot enough, fill a tin with some water and place it on the bottom of
the oven, leave in for 3 minutes to create enough steam.Take the towel off, pinch the loafs with the tip on your fingers on the surface GENTLY Bake till they become nicely gold ( watch the water in your tin not to fully evaporated )
at this point take the water tin out, and continue to bake till they get that nice
brown crust.Remove from the oven and allow to cool on a wire rack.

You May Also Like
